Tuesday, July 31, 2012

Somehow I Hit the Jackpot Today

 When I came home from work today, I had -- not one, but TWO wonderful handmade cards waiting for me in the mail. It's like hittin' Paydirt ~~
Whoo Hoo!!!!!

How incredible is that?
 This card is from Ann Cardile.  She is a friend of mine from Texas.  She is a fabulous stamper and makes being a Stampin' Up! demonstrator her full-time job.  It really pays off for her, too.  She has won trips every year that she has been a demonstrator.  She is one unique individual. 
I count myself very, very lucky to know Ann.  I still can't believe she sent me a card! It's really fun to get a card in the mail.

What Ann used: (as far as I can tell anyway)
Stamps:  By the Seashore and _____ with the "Life is a matter of moments" - do we still have this one?  can't find it and could use help if you know what it is; Ink - Early Espresso, Pumpkin Pie, More Mustard, Soft Suede, and Lucky Limeade (but that's just a guess); Big Shot; Elegant Lines Embossing Folder, Top Note Biz Die; Card stock - More Mustard, Pumpkin Pie and Whisper White; Punch - Scallop Oval.

Fun, fun, fun.  After all, a gal can't survive on bills alone, can she?  No, she cannot!  A card every once in a while is a wonderful relief.  


Today, I had one of those days at work where I watched the clock inch S-L-O-W-L-Y by.  When I worked at a tool factory -- ever so long ago -- I would get super bored and call the number for time constantly to make sure the clock was correct.  Every once in a while, I would get to move the minute hand up a tad because maybe (and I mean a great big MAYBE) it had slowed down . . . but that was very rarely because it was usually on time.  (Sigh)
Those were the old days all right.  
These days, I'm kept busy at work.  I don't know what it was about today.  Just one of those days . . .

To sign up for my absolutely and completely FREE newsletter, click here.
To make a Stampin' Up! product purchase, just click here.


Let's hope tomorrow is NOT one of those days again ~~ thanks for stopping by.  Happy Stampin' and Scrappin'!

Monday, July 30, 2012

On the Road Again - Free My Digital Scrapbooking Program for You!!


Summer is the season where it seems like everyone is going somewhere ... vacation, family reunions, weddings, picnics ... and that usually means lots of photos! Luck for you, My Digital Studio (Stampin’ Up!’s Digital papercrafting & scrapbooking software) can help you get those photos off of your camera (or your phone) and into a place where they can easily be enjoyed. And the best part? You can take My Digital Studio (MDS) on the road with you, so that you can scrapbook your photos almost as they happen!
 Here are some tips for using My Digital Studio on the road:
-  Create your page layouts BEFORE your trip so that all you have to do is insert your photos and journaling while you’re on the road -- some really cool layouts come with the program.
-  Load your photos onto your computer at the end of each day to keep them organized by day.
-  If you don’t have time to journal your photos in MDS every day, keep a notebook with you to makes notes of special things or keep an online journal in a word document so that your memories will be right at hand when you’re working in My Digital Studio.

Remember to bring along your MDS. It’s like packing up all of your scrapbooking stuff and putting it into one small and very portable box - your laptop. And at the end of your vacation, you’ll have a fabulous scrapbook to relive those memories over and over again.  So easy.

Don’t have My Digital Studio? No worries - you can download a 30-day Free Trial from my Online Store (#129600) and take it right along with you on your next adventure.  

Can you believe it?  Absolutely FREE! Best deal in town!  What a fantastically great value.  To log into my online store for your free 30-day MDS trial, all you do is click here.  It's that easy.
To get signed up for my free newsletter, just click here.

Enjoy bein' on the road again ~~ and, as always, thanks for stopping by.  Happy Stampin' and Scrappin'!

Friday, July 27, 2012

It's Got Glimmer and Glitz - A Mixed Bunch and Loving Thoughts, Too

Lots of glimmer and glitz on this card.  In fact, when I was given this card, I said, "This card is a Wow!"  That made Christine (the maker of the card) very happy.  She went around telling a few people that she had a "Wow" card.  Cuz she did.
 It took quite a while for Christine to make these cards, and she had never done a swap before -- this was her first Convention.  She was afraid her card wouldn't be nice enough.  


Whoa!!  No worries there, that's for sure!
 Can you see how it sparkles?  Look at all the colors under that shimmer . . . it has markers and Dazzling Diamonds with double-sided tape to get all that glimmer on the card with the Dazzling Diamonds.  She finished it all off with a fixative to keep it in place.
Here's what Christine used:
Stampin:  Mixed Bunch and Loving Thoughts; Card Stock and Markers - In Colors 2011-2013 - Island Indigo, Pool Party, Wisteria Wonder, Whisper White; Ink - Island Indigo, StazOn Black; Embossing Folder - Vintage Wallpaper; Big Shot; Punches - Modern Label and Blossom; Embellishments - Basic Rhinestone Jewels, 5/8" Organza Ribbon, Dazzling Diamonds, Sticky Strip (for the double-sided tape), and fixative; SNAIL adhesive and Stampin' Dimensionals to keep it all together.

I never would have thought to throw these colors together -- but they really work well, don't they?  Lots of glimmer and glitz. 

Today was such a busy day at work . . . it's super, duper good to be home and relaxing for a little bit.  And, you know, making cards is one of the most relaxing things I know.  You get a quick reward from it because you can have something finished in your hand almost right away.  It's great to take that card (or other paper creation) and give it away afterward.  Think of it as double-rewarding yourself. 

Reward yourself with my free newsletter by clicking here to get on the mailing list.


Shopping can be very rewarding, too.  Just click here to shop for these great products, 24/7.


Thanks, Christine, for sharing your beautiful card with us.  Thanks to you so much for stopping by ~~ Happy Stampin' and Scrappin'!

Thursday, July 26, 2012

I Am . . . A Friend - Always and Before All

 And this card proves it -- doesn't it?
This is one of the great and fabulous Make 'N Takes from Convention last week.  Was it really just last week?  Seems like forever ago now.  Everyone is back to the old schedules and routines.


Did I tell you that while I was gone, other people had to bring in our mail in this house?  Yessiree.  Two boys who are old enough to bring in the mail had to bring in the mail -- this is not hard to do.  And you know what else?  Now they cannot find the mail.  Okay.  Really?  Yep.  We have no idea what happened to that mail.
So -- if you were a wonderful friend to me and sent me a card while I was gone . . . please send me another one because no one knows where that first one went.  (Crazy kids!)  I still love 'em.
What was used for this great card:
Stamps - Affection Collection (available August 1); Card stock - Early Espresso, Primrose Petals, Whisper White; Ink - Daffodil Delight, Early Espresso, Midnight Muse (stamped off twice), More Mustard, and Primrose Petals; Other awesome stuff - Rhinestone Basic Jewels, Stampin' Dimensionals, SNAIL adhesive, Bone Folder, Scallop Edge Punch, Small Heart Punch, Paper Snips, stapler and staple.

When you do this kind of stamping, just layer the colors from lightest to darkest when you stamp. I punched the heart out using the small heart punch and adhered it to the card using a Stampin' Dimensional.  Love that grungy look.  This is just my style of card.

Sign up for my free newsletter here.


For stampin' supplies, just click to go to the on-line store right here.  24/7 -- very friend-worthy place.


Stay friendly and thanks for stopping by ~~ Happy Stampin' and Scrappin'!

Wednesday, July 25, 2012

I Was Framed!

LOL!  Actually, the bird from Betsy's Blossoms was framed, along with some Designer Series Paper, a Blossom Punch, and a Labels Collection Framelet that has been embossed with the Chevron Embossing Folder using the Big Shot.
 The Faceted Designer Buttons have magnets on the backs of 'em.  What a fun way to frame up some art and make it functional, too!

Did you notice the Blossoms Punch was used on the flower image from Betsy's Blossoms?  The In Color Dahlia makes a great center for the flower, doesn't it?

This was a project Shelli showed at the Convention last week. 

For more great ideas, get my free newsletter by signing up here.


You can shop for any of these items right here.

Did you have a crazy day like I did?  My hearing aids have been dead since before convention, which was interesting, let me tell you.  At least my roomie didn't mind translating when I couldn't hear what people said.  It was ever so nice of her to be patient with me.


I went to the hearing aid place from work (first appointment I could get was today at 3:00), and they confirmed that the aids were dead, dead, dead.  At least I wasn't imagining it.  Anyway, they "fixed" them, and now they are beginning to have issues again.  "Beep, beep, beep, beep," in my hear it goes.  It's nuts, I tell you!


Oh well.  What can you do?  Hope your days isn't nuts.  Thanks so much for stopping by ~~ Happy Stampin' and Scrappin'!

Tuesday, July 24, 2012

Taking My Breath Away - Beautiful Centerpiece

 Love the glimmer -- love the glitz!  Gotta have a fab centerpiece this fall -- and this is gonna be it!!
Champagne glimmer paper (available August 1), Autumn Accents Bigz Die (available August 1(, a candle, some StazOn Black ink, along with the En Francais background stamp.  The brushed bronze button (available August 1) with the Baker's Twine adds the perfect finishing touch.

Having a centerpiece like this is easy -- it will truly only take about 15 minutes or so -- can you believe it?  You'll be taking everyone's breath away when the fall season comes and you have something so beautiful on your table.  No one needs to know it was easy peasy, lemon squeezy.


To sign up for my free newsletter, just click here.


To purchase any of these great supplies, just click here.


Hope something beautiful catches your eye today ~~ thanks for stopping by.  Happy Stampin' and Scrappin'!


Monday, July 23, 2012

Picture Opportunity with Shelli Gardner

 I've just gotten back from convention in Utah today.  I'm busy unpacking and doing the things that make me feel like "I Am . . . a mother and wife".
At convention, I got to actually meet and talk to Shelli, the founder of Stampin' Up!, the company I support by being a demonstrator.   These pictures let me know, once again, I'm not the photogenic sort.

Here we are, getting ready for a hug.
 She was asking me how many years I've been a demonstrator, how many conventions I've attended, and if I've walked across the stage -- probably stuff everyone talks about.  She has a way of making you feel like it's the first time she's discussed it, though. 


Ta da!!  This is the final picture and turned out just horrible, didn't it?  
Aargh!  
LOL!  
I finally get to have a "real" picture with Shelli Gardner, and it looks like this!!!  Thank goodness Shelli's daughter Megan took several pictures.

Oh well.  Maybe next time.

Say, there's always a next time to sign up for my newsletter.  You can do so right here.

If you are wanting some Stampin' Up! products, just shop right here.

Until next time -- hope all your pictures turn out the way you want . . . Happy Stampin' and Scrappin'!

Friday, July 20, 2012

Your Kindness Means So Much

It truly does.  Your kindness matters and means so much.  That's why I'm so glad you stop by to visit.  It's kinda odd.  I seem to get more e-mails from people than I do comments on the blog -- that's okay, though.  I love to hear from you, no matter how it happens.  Thank you for letting me know you're there and that you look at the blog.
 This is my fav from all the ones I've made this week while in my Winter in July mode.  I wanted to escape from the heat and I've had so much fun doing it.  I hope you've enjoyed it, too.

 What I used:
Stampin' Write Markers - Baja Blue and Wild Wasabi; Stamp set - From My Heart; Big Shot, Northern Flurry Embossing Folder, Decorative Label Punch, 3/8" Taffeta Ribbon Whisper White; Paper - Subtles Designer series Paper Pattern Stack; Whisper White, Wild Wasabi, Baja Breeze and Crumb Cake.  Ink - Pink Pirouette, Paper Piercing Tool, Stampin' Pierce Mat, Essentials Paper-Piercing Pack; SNAIL adhesive, and Stampin' Dimensionals.


It will be cool when you sign up for my newsletter right here.
Shopping is a cool experience at my Stampin' Up! shop right here.
Keep your cool in this heat.  Thanks for stopping by ~~ Happy Stampin' and Scrappin'!

Thursday, July 19, 2012

Paper Piercing Fun

 Fun, fun, fun . . . I just enjoy paper piercing so much.  And it's so much easier to do these days with the Paper Piercing Pack.  There are all these templates that you put on a coordinating shape (love how Stampin' Up! coordinates almost EVERYTHING).  Sure makes crafting quick and easy. 
 I wanted to use some of the same colors that I did two days ago and make some great cards since I had everything out already (did I really say that? - do you leave some things out on your craft table, too?).
The stamp set I used for these great cards is the From My Heart set.  I've been itching to use it on something ever since I got it.  It's such a cool stamp set.  I've used one of these great stamps for some of the swaps I took to Convention this week.  Such a great set.  Very, very versatile - and being used on these cards in a very different way.  In fact, if you didn't know it was this stamp set, you wouldn't even think that it was.  Everything was punched or "fussy cut" out, except for the Happy Birthday because that's on its own in the set.

What I used:
Stamps - From My Heart; Big Shot, Northern Flurry Embossin Folder, Labels Collection Framelits; Neutrals Brads; Inks - Soft Suede and Baja Blue; Paper - Whisper White, Wild Wasabi, Baja Blue, and Crumb Cake, Paper Piercing Tool, Stampin' Pierce Mat, and Essentials Paper-Piercing Pack, Paper Snips; Large Oval Punch, and Word Window; SNAIL adhesive, Stampn' Dimensionals.

Tip:  Use rubbing alcohol in a spray bottle and quickly spray your paper before running it through the Big Shot in the Embossing Folder.  Your images will come out much crisper and deeper.  
Click here to sign up for my FREE newsletter.
Click here to shop 24/7.
Hope you have a wonderful day.  Thanks so much for stopping by ~~ Happy Stampin' and Scrappin'!


Wednesday, July 18, 2012

Thinkin' Cool Thoughts with Mini Notes

 Who wouldn't enjoy a thoughtful tag with a special bag of treats? 
  I was makin' these little 3 x 3 cards with adorable snowmen and a snowgirl and having so much fun dressing them up with these great accessories in the Stylin' Snowfolk stamp set. 
 There are so many faces and, of course, I used lots and lots of glitter (with the Glimmer paper).
I think these little cards just plain dazzle!!
What I used:
Paper - Cherry Cobbler, Gumball Green, Whisper White card stocks, Silver Glimmer Paper, Be of Good Cheer Designer Series Paper; Punches - 1-3/8" circle,1-1/4" circle Punch; Ink - Pumpkin Pie Stampin' Write marker, Basic Black Ink; Paper Snips, Dazzling Details, and Cherry Cobbler Dazzling Details, SNAIL adhesive, Mini Glue Dots and Stampin' Dimensionals.

These mini note cards are perfect for attaching to a gift of to a plate of holiday treats.

Sign up for my newsletter here.
Feel free to shop for Stampin' Up! supplies here.

Stay cool in this July heat.  Thanks for stopping by ~~ Happy Stampin' and Scrappin'!


Tuesday, July 17, 2012

So It's Not Traditional

It's a re-do.  I mean, have you ever wanted to do that?  You know, you just stop everything and say that you want a do-over?

Well, I re-did yesterday's stuff with some non-traditional winter and holiday colors and also replaced the heat embossed background with embossing details using the Big Shot.
 I went with the non-traditional Chrsitmas/winter colors of Baja Breeze, Crumb Cake, Wild Wasabi and Pink Pirouette.  This was soooooo much fun!
Now, remember -- you can always e-mail me and ask for tutorials or PDFs.  I often get requests, and I always try to get right back, so feel free to let me know about your interests in any of the projects that I show on the blog.


Anyway,
What I used:
Stamps - Stylin' Snowfolk; Paper - Subtles Designer Series Paper pattern Stack, Baja Breeze, Crumb Cake, Whisper White, Wild Wasabi, and Pink Pirouette; Ink - White Craft; Basic Black, Baja Breeze and Pumpkin Pie Stampin' Write Markers; Punches - Large Scallop Circle and 1-3/8" Circle; Big Shot Norther Flurry Embossing Folder, Labels Collection Framelits, 1/2" Crumb Cake Seam Binding Ribbon, Cellophane bags, SNAIL adhesive, Sticky strip, Glue Dots, and Stampin' Dimensionals, Brayer.

Tip - I used the Brayer with Whisper White Craft Ink on top of the bag to highlight the snowflakes.
Remember -- you can sign up for my free newsletter right here.

Shopping for your fav Stampin' Up! supplies is super easy - right here.
Thanks so much for stopping by today ~~ Happy Stampin' and Scrappin'!


Monday, July 16, 2012

Stylin' Snowfolk

 Whether you go for traditional or whimsical, you'll have a blast seeing all the different snowfolk you can create with the great stamp set Stylin' Snowfolk.  Aren't these awesome little treats?
 I just got some of the Silver Glimmer paper in an order and couldn't wait to work with it again.  I just LOVE that stuff, and I burn through it like nothing else!

What do I love about Glimmer paper?


Well -- we all love a bit of bling on our projects, but sometimes we just don't want to deal with the mess that glitter can leave behind.  Enter Glimmer Paper . . . Ta Da!!  Lots of bling/No mess.  Just the ticket.
Each snowfolk has a different face -- one of the things so cool about this stamp set because they are individual as you are.  I sandwiched Peppermint Patties between the layers of Designer Series Paper to make these treats.

E-Mail me if you are interested in tutorials for these projects.  I would love to get together with you and make them, too.

what I used:  
Stamps -  Stylin' Snowflk stamp set, Jolly Jingles Jumbo Stampin' Around Wheel, Paper - Be of Good Cheer Designer Series Paper, Glimmer Paper, Whisper White, Cherry Cobbler, and Gumball Green card stock; ink - Basic Black, Soft Suede, Cherry  Cobbler and Gumball Green, VersaMark Ink Pad and VersaMark Ink Refill, Stampin' Write Marker in Basic Black and Pumpkin Pie; Ribbon - 3/8" Taffeta Ribbon; Dazzling Details Cherry Cobbler and Plain; Iridescent Ice Stampin' Emboss Powder, Cellophane bags, Heat Embossing Tool; SNAIL Adhesive; Mini Glue Dots, Stampin' Dimensionals, and Sticky Strip.

Whew!  That's a lot of stuff.  And how cool is this?  Love how all my snowfolk turned out.  

Sign up for my FREE newsletter here.
You can shop for Stampin' Up! supplies right here.
Enjoy this bit of winter in July -- think cool thoughts!  Thanks for stopping by ~~ Happy Stampin' and Scrappin'!


Friday, July 13, 2012

I've Been a Busy Little Bee

 Bzzzzzzzzzzzz
 "Oh, here's my beehive hole!"
 BBbbbbbzzzzzzzz
 Side view of that great seam binding ribbon.
 Here's the back.  I think next time I won't put a hole on this part.
Do you like it?  Just a little cutting, punching and sponging.  I used mostly Stampin' Dimensionals to adhere everything together.  


I got this fabulous idea from Craft Project Central.  They have wonderful ideas for you to use and (I think) you get 10 ideas a month for only $10 -- I don't remember for sure about how many things you get.  Can't beat that kind of price, though. 

I would love to turn this thing into a class.  What do you think?

What I used:
Extra-Large Oval punch, 1-1/4" Circle Punch, Daffodil Delight card stock, Basic Black card stock, Sticky Strip, Paper Snips, Stampin' Sponge, More Mustard ink,Stampin' Dimensionals, Snail Adhesive.

You can sign up for my free newsletter here.  You get a free PDF as a thank you when you sign up.
You can always shop right here.


Have a honey of a day.  Thanks for stopping by ~~ Happy Stampin' and Scrappin'!

Thursday, July 12, 2012

Huh? It's a Bargello! Learn Something New Today

From the Merriam Webster Dictionary on-line, I found this definition:
Bargello: a needlework stitch that produces a zigzag pattern.  You can find the definition yourself right here.  How about that?  You learn somethin' new every day.

Well, that's what this technique is called.
 It's super easy.  Here's how:
  • Cut several 3/4" strips of patterned paper, at least two from each pattern of paper that you have.  I also cut from Raspberry Ripple card stock because it looks great with one darker strip to contrast dramatically.  The patterned paper that I used was the Birds of a Feather Designer Series Paper (No, I did not realize that was a flamingo on that paper until after the card was all put together -- that's why it's upside down. I just thought it was a pattern.  Oops!! LOL)
  • Adhere the strips on a piece of copy paper in a consistent design with the sides touching and the edges as even as you can.
  • Then cut several strips in various widths of your new paper you've created.  
  • Play around with your strips to create a design of some sort.  You can arrange them in a zigzag pattern to be truly Bargello.  You can do a wave pattern.  You can create a pyramid design of sorts -- even rick rack.
  • Adhere your strips in the pattern of your choice directly onto the card base or another sheet of copy paper to make a layer.  You can even just trim to have a larger layer.
  • Make your project using your new Bargello paper!
 
I used the One in a Million stamp set, Framelits Labels Collection, a bit of paper piercing, along with the Mini Silver Brads to finish off this great thank-you card.

The other great stuff I used to make this card was:
Stampin' Pierce Mat; Paper-Piercing Pack Essentials; Paper Piercing Tool; Paper - Raspberry Ripple, Whisper White, and Crumb Cake card stocks; Birds of a Feather Designer Series Paper; Snail Adhesive.

Go ahead -- give this fun and easy technique a try.  I've gotten a lot of positive comments from this one already.
You can sign up for my free newsletter here.
You can always shop for these great products right here.

Enjoy your day.  Aren't you glad you learned something new today? Thanks for stopping by ~~ Happy Stampin' and Scrappin'!

Wednesday, July 11, 2012

The Kind of Friends Everyone Wants


All right!  It's quiz time.  Here's a question for ya --
What makes a great friend?

  • someone who listens?  
  • someone you can call no matter what?  
  • someone you can count on?

Someone who is a friend like that to me is Bev.  She made me this card.   

What makes this a great card?  The color combination is unexpected; it has lots of texture; it's so cheery; it came from my friend Bev.  She is a really talented stamper, demonstrator, and has a blog that I visit almost every single day. 
I hope you'll be sure to give her a visit and a comment, too.  Those kinds of things make a blogger's day.


So -- not only is it good to send cards, but it's wonderful to receive them, too.


This card came from my good friend Sheila.  She is a principal and was retired; however, she's so good at what she does that she has come out of retirement to help at a school where she was needed.  She knows how to communicate with children in such a special way. 

She made this card for my son's graduation.  How fantastic is that?  


Getting these cards in the mail have reminded me to send out more cards.  I've sent out/given away at least one every day for two weeks now.


I just imagine people when they get the cards . . . they're sorting through their mail when -- all of a sudden -- they see it!  It's a  hand-stamped card from a friend.  Yep -- that's special.  I want to be that kind of a friend to others.  

How about you? Do you have some friends that are the kind of friends that everyone wants?  For that matter, what kind of a friend are you?

Know what?  We can be friends.  I would love to hear from you.  You can sign up for my newsletter here.  It's free, and I'll send you newsletters and stuff like that.


Shopping with Stampin' Up! can be found right here.  It's a friendly place that you'll love.


Thanks so much for stopping by ~~ Happy Stampin' and Scrappin'!

Tuesday, July 10, 2012

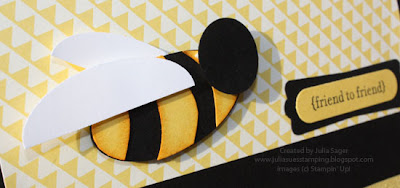
Just Buzzin' By

OOOooooooo!  What a cutie!  How do you like this busy little bee?  I'll admit it -- I was feeling a little punchy, so I made this cute little guy for an easy card I had in mind.
So much fun on this great card for a friend.  

You're gonna be amazed at how easy that little guy is.  Here's what you do to make the bee:
  • punch (1) Small Oval in Whisper White, cut in half (wings);
  • punch (1) Small Oval in Basic Black (body);
  • punch (1) Small Oval in Daffodil Delight (stripes) - cut this oval into five "stripes";
  • punch (1) 3/4" circle in Basic Black (head).
  • discard two of the stripes and sponge the edges of the other three stripes with More Mustard ink. Adhere the stripes onto the body.  Attach the head and wings with Stampin' Dimensionals.  
  • Arrange the wings using Dimensionals on one side and adhesive on the other.
So easy and cute -- anyone who likes bees will LOVE this card.


What I used:
Punches:  Small Oval punch, 3/4" circle punch, Word Window Punch, Modern Label Punch; stamp set - Teeny Tiny Wishes; Ribbon - Daffodil Delight seam binding; Paper - Basic Black and Daffodil Delight card stocks, Summer Smooches Designer Series Paper; Basic Black ink; Snail adhesive; Stampin' Dimensionals; Stampin' Sponge.


Do you know anybody who likes bees?  It's a pretty popular theme.

Buzz on by and sign up for my FREE newsletter.  Just click here.


Shop for all things Stampin' Up! anytime right here.  It's a BEEutiful shopping experience.

Thanks for BEEing here today ~~ Happy Stampin' and Scrappin'!

Monday, July 9, 2012

I'm Goin' in Circles -- or At Least Seeing Circles

 I'm seeing Circles!  Circle Circus that is!!  


I needed a guy birthday card for my brother.  Don't worry -- he won't mind the hearts on this one (he's in a household full of women, so I'm sure he's used to lots of hearts everywhere).  There aren't too many hearts on this card anyway.


I love the oodles of layers on this card!
 No naked envelopes here.
The Perfectly Penned stamp set has the curly sentiment that's just right for the Circle Circus elements on this card.

What I used:
Papers:  Patio Party Designer Series Paper; Whisper White, Midnight Muse and Baja Breeze card stocks; Midnight Muse, Primrose Petals, Summer Starfruit and Baja Breeze inks; Snail adhesive and Stampin' Dimensionals.

That's really all that was used to make this card.  How easy is that?  And it looks great.  He's gonna really like getting this card.  Especially because it's gonna be on time for once.  


My latest newsletter is going out soon.  To get your FREE copy in your personal e-mail box, just click here.

To shop Stampin' Up!, just click right here.

Hope you're not running around in circles with your day.  Thanks ever so much for stopping by ~~ Happy Stampin' and Scrappin'!